Friday, January 23, 2009

4-In-1 Minis


It's been a long time since I last posted a cake.

This 4-in-1 mini cakes was done last weekend for a friend's MIL. These are 5" cakes of different flavour, being chocolate, green tea, mango & durian. Flavours can be customised to suit individual's preference.

This will be the last cake I'm posting before I go off for a 2 weeks break.


I would like to wish all those who are celebrating Chinese New Year,

GONG XI FA CAI

Thursday, January 22, 2009

Pumpkin Muffins


Oh dear I've been so busy lately, just realized it has been more than 10 days since I last posted !

I've been trying to clear my freezer last week & have not been doing marketing since then. I've thrown away little containers of sauces that I've frozen for later use, since I won't be cooking for a while. There's still 2 containers of pumpkin puree in my freezer, one portion I've made some pumpkin & honey buns , another portion for the pumpkin muffins I'm posting now.

This is the link to the original recipe, from a Hong Kong blog & it's in Mandarin.
I've translated the recipe :

Ingredients :

110g Butter
60g Sugar
2 Eggs
20g Honey
150g Pumpkin puree
90g Flour
30g High protein flour
6g Baking powder
60g Sultanas

Cream butter & sugar until light & fluffy. Add eggs, one at a time & continue beating until smooth. Add honey & pumpkin puree to the mixture, mix until well combined. Add sifted flours & baking powder into the mixture, fold through. Lastly, add sultanas.

Fill muffin cups till 2/3 full, bake in preheated oven of 180C for 20-25 mins.

Monday, January 12, 2009

Flat Rice Noodles


This is our dinner tonight. Yes, I know it's just a portion of some braised meat over what looked like flat rice noodles or commonly known as kway teow. You're right, this is braised beef shin served over kway teow. This is home-made, I mean the kway teow, I made them from scratch !

Alright, people may be thinking that there's no big deal, it's just kway teow & it's easily available in wet markets & supermarkets too ! But I don't think so, we are a health conscious family, I bake my own bread, prepare 3 meals Monday to Friday, bake my own cakes, my own desserts. I cook with olive oil, very little salt & we don't take fatty meat, stick to chicken breast & I hardly cook pork, if I do it'll only be shin & ribs. I've switched to organic vegetables & have heard of horrible additives in our food nowsadays !

We eat a lot of noodles, usually store bought. I've never fancy the oily yellow noodles but CJ seems to like it, so if I have to cook it, I'll look for it at a shop in Foh Sang which sells the noodles with less lye in it & that will only be a once in a blue moon meal. I love kway teow & the thinner the better. So each time if I want to order kway teow, I'll ask the stall owner if the kway teow he/she uses is the thin type, if not I'd rather have vermicelli (mifen).

Frankly, making my own kway teow never cross my mind. I've heard of boric acid but that didn't really bother me. What I can say is the strange smell we get in store bought kway teow & I always blanch them before I cook.

It was only when I came across Zurin's that I realised that kway teow can be made at home. That motivated me but I was really busy during the festive season last month so I put the idea aside. Then last week, I saw on Terri's blog about making kway teow again. Wow these 2 super ladies really make me want to try making my own.

So, this morning after sending the girls to school, I came home & started my venture of kway teow making. I followed the recipe given by Zurin but changed the wheat starch portion to 2 tablespoon as per Terri's as I like the bite in kway teow. Well, the results as follows :


I've used a square shallow baking pan for steaming. The cooked thin layer of batter.


Rolled rice noodles, ready to be cut


Voila ! The end results


After the guinea pigs (hubby, CJ & JF) tried my kway teow, I asked them for opinion. Both the girls said it was nice, I'm not sure if they can tell the difference between home-made & store bought. The moment I told them I made it, CJ said " Wow Mummy u know how to make kway teow ? Cool " Then the fussy one, hubby said it was ok but tasted floury. I'm not sure if it was too thick or he's just too used to the commercial type. I'm making it again & will try to go thinner even though I've already poured a very thin layer of batter into the pan.
I followed the recipe & it yields 500g of kway teow & guess what ? I didn't get to taste it ! It wasn't enough for the 4 of us, so I have to go though my pantry, used dried vermicelli for my portion. The next time I'll make 1.5 portion & that will be very soon............

Thank you Zurin & Terri for the great recipe & tips !!!

Sunday, January 11, 2009

Pineapple Tarts


Each time when Chinese New Year is round the corner, I'll whip up a batch of painstakingly made pineapple tarts for giveaways & own consumption. I think these pineapple tarts should be called giant tarts ! These are much bigger than the regular ones you see packed in plastic containers, available everywhere now.

I've always make my own pineapple tarts from scratch & will never buy ready-made ones. Firstly, those mass produced ones are probably made using margarine which is a no-no for me, secondly they use ready-packed pineapple paste.

The recipe is adapted from Betty Yew's book. I've made adjustment to the portion & this is mine :

420g Plain flour
420g Self-raising flour
300g Icing sugar

450g Butter, diced
150g Ground almonds
3 Tsp vanilla extract
3 Eggs, lightly beaten
Cloves for decoration

Put sifted dry ingredients into the bowl of a food processor fitted with a cutting blade. Put in the butter & blend until mixture resembles breadcrumbs, stir in ground almonds. Add vanilla extract, beaten eggs, mix to a smooth dough. Wrap up the dough & chill for 30 mins.

To make sure all tarts are the same size, I've weighed each dough ball, at 25g each. Flatten each pc of dough with lightly floured hands. Place a cherry-sized (original recipe says this but mine is definitely bigger than a cherry size, can't think of something suitable to describe my filling size now) ball of pineapple jam in the centre, wrap & seal well.

Roll into pineapple shape. Snip the surface of the pastry with a small pair of scissors to form pineapple patterns. Stick on a pc of clove on one end to represent the stem. Place on greaseproof paper on a baking tray. Brush with egg yolk mixture. Bake in preheated oven of 180C for 15-20 mins or until golden brown.

Pineapple Jam :

6kg Pineapples, peeled, cleaned & cut into chunks
3 Pandan leaves, knotted
Sugar, to taste

Blend pineapple chunks in a blender, pour into a sieve to let the juices drain. Put the pineapple pulp in a large saucepan & cook on high heat for 15 mins. Add sugar & knotted pandan leaves. Cook & stir over medium heat for about an hour, or until jam is thick. Remove pandan leaves & let cool.

I've used the sweet honey pineapple so I didn't follow the original recipe which should be using at least 500g of sugar for my portion of pineapples. I've only added about 8 Tbsp of sugar (120g) when cooking the jam. The pineapples are so sweet that I've kept the drained juices for our own consumption.
For the above portion, I managed to make 65 tarts.

Friday, January 9, 2009

Monster Truck for Ethan


This cutie is Ethan & he turns 3 today. He's so into monster trucks I once saw his mum's car boot filled with all type of trucks ! During our last trip to Brunei, he was looking for monster trucks everywhere we went & he got what he want ! At the bookstore, he got a book about monster truck & there were little trucks that came with the book. At Mothercare, he got another set of huge monster truck.

Ethan's mum called me on Tuesday to ask me to bake a cake for his birthday. As his playschool class are all little kids of 2 - 3 years old, she didn't want a chocolate cake in case the kids mess up their clothing. So we decided on a vanilla sponge cake filled & frosted with buttercream. The theme ? Monster truck of course ! We had a cute monster truck drawn onto the cake, hope the little cutie had a great time at his class party !

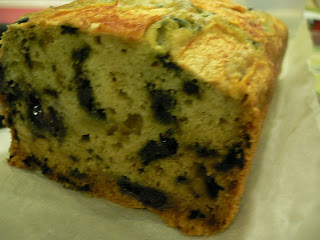
Easy Blueberry & Apple Bread


I couldn't get enough of apples these few days.

Yesterday, I was trying out a new recipe for an apple cake which looks so light & yummy in the book. However, it was a huge flop, I don't know if it was the recipe or my fault ! I'll give it a try again in a few day's time.
By the time I finished with the experiment, it was 4pm & I started to panic. Why ? Because there's no breakfast for the next day. Apples came to my mind again, so I thought of my Irish soda bread.

This is a very easy food processor recipe which I use quite often when I don't have time to make anything for breakfast.

Ingredients :

2 Cups flour
4 Tbsp Sugar
1/8 Tsp Salt
3/4 Tsp Baking soda
1 1/2 Tsp Baking powder
45g Butter
1 Cup Milk
125g Blueberries*
1 Apple, thinly sliced

In the bowl of a food processor, combine flour, sugar, salt, baking soda, baking powder & process till well combined. Add butter & process till the mixture resemble breadcrumbs. Add milk to the mixture, process again until the smooth batter forms. Lastly, fold the blueberries & the sliced apples into the batter, leaving some apple slices for arranging on the top. Sprinkle some cinnamon sugar on the top of the apples. Bake at preheated oven of 170C, on the lower rack, for about 50 - 55 mins. I've used a 8x3" loaf pan.

*Bluberries can be replaced with sultanas or dried cranberries.

Birthday Cake For Chris


This is a chocolate banana cake, baked for Chris, who turned 22 on Wednesday.

Terri wanted a drawing of Chris, with a red swimming trunk. I showed D the picture of this young man & he came up with the above picture. Hope the picture met the expectation of what she had in mind, heehee ........

Tuesday, January 6, 2009

Apple Buns


The girls started their new term yesterday. It used to be much later than local schools but I'm still glad that it's a day later. I was out Monday afternoon & happened to be at Likas area where there's quite a number of schools there, the traffic jam was so so bad, we got to make a detour to get to Tanjung Lipat area.

Well, the girls are really happy to be back to school after a 3 week break, so am I ! They spent most of their holiday at home & I think they were really bored. We couldn't go anywhere because I was so busy with my festive baking but at least they got some hands-on fun in the cookie session.
Back to school means I have to start preparing their lunchbox & making bread every weekday, so no more lazing around..........

Back to the bread making, it's been weeks since I last baked some. I was thinking of some fruity bread so after flipping through my books, I decided on this apple buns from Alex Goh's World Of Bread. I've used his baisc sweet bun dough recipe :

Ingredients :
(A)
480g Bread flour
120g Plain flour
110g Sugar
10g Salt
20g Milk powder
4tsp Instant yeast

(B)
1 Egg
300ml Cold water

(C)
60g Butter

Mix (A) till well blended. Add (B) & knead to form a dough. Add (C), continue to knead to form a smooth & elastic dough.

Place dough in a large bowl, cover & let it prove for 50 - 60 mins or until it doubles in size.

Filling :
(A)
400g Apples, cut into cubes
150g Sugar *
Pinch of salt
110ml Water
1Tbsp Lemon juice

(B)
40g Cornflour*
40ml Water

(C)
20g Butter

Cook (A) til boiling, add the premixed (B) & continue cooking till mixture thickens. Remove from heat, add (C) & mix till well blended. Leave to cool.

Divide the basic sweet bun dough into 70g portions, mould into balls & put them in the fridge to rest for 15 mins.
Roll the each dough ball out flat to make rectangle (L14cmXW12cm). Place some of the apple filling at one end & cut strips at the other end with a sharp knife. Roll them up from the filling end.
Put on a baking tray, lined with baking paper & leave to prove in a warm place for 45 mins or until they double in size.
Brush with egg wash, bake at preheated oven of 190C for 12 - 15 mins.

* I've used Royal Gala apples which I think are sweet so I've reduced the sugar to only 50g when cooking the apples. As for the cornflour & water, I found 40g of cornflour makes the filling too thick, the next time I will probably reduce the cornflour to 20g & water to 60g. I've also added a dash of cinnamon powder. I'm hopeless in shaping buns so I've made them round instead !

Thursday, January 1, 2009

Mickey Mouse Cake


Little Toby turns 3 today.

For his birthday celebration, he has a chocolate banana cake with a MM face on it.
The MM face is drawn onto the cake & piped with different shades of buttercream.

LinkWithin

Related Posts with Thumbnails